1
Check subsurface for load-bearing capacity, remove the separating layers, check suction performance. If required, free from dust, premoisten and prime.
2A Note
All ELEMENT construction panels must be stored lying down straight in a dry place. If an ELEMENT construction panel should be slightly warped due to improper storage or other reasons, they can usually be straightened by light bending and pressing.
2B Note
Before applying the adhesive in dots, pre-pierce the holes for the dowels with a cross slot screwdriver.
3
Cuts and notches are made quickly and easily with the jig saw or a cutter knife.
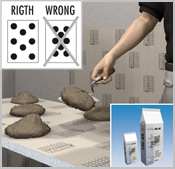
4A
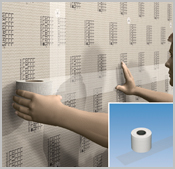
Depending on the evenness of the subsurface, apply the fixing adhesive COL-AK pointwise on one side using clots of adhesive (6 – 8 pcs. per m2).

4B Note
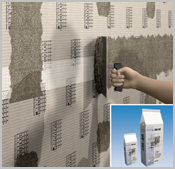
If ELEMENT-EL Baby 4 is used, always apply the fixing adhesive COL-AK over the full surface using a toothed trowel. This technique is also possible for thicker panels, depending on the substrate.

5
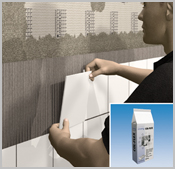
Apply the fixing adhesive COL-AK to the edges of the ELEMENT construction panels, thus bonding the individual elements together.
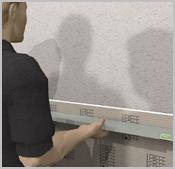
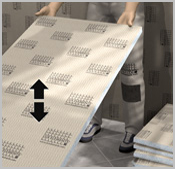
6A
We recommend horizontal placing for ELEMENT. Draw alignment markings before application, if possible. Then press on the ELEMENT with the level and spirit level and check not only the individual but also the reciprocal vertical ...
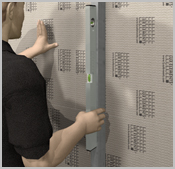
6B
... and horizontal alignment of the ELEMENT construction panels.

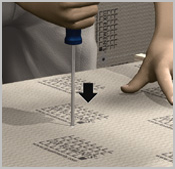
7
TIP: Pre-drill dowel holes. Then ...
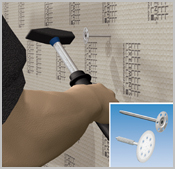
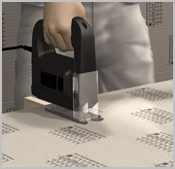
8
... dowel with FIX-FID or FIX-KSD. Pay attention to water and power lines!
9
All element joints must be reinforced with glass fibre reinforcement strips ARM-100 SK.
10
Level out the reinforced element joints and the heads of the hammer fix plugs with COL-AK.
11
The surface is now ready for tiling. Further requirements
(e.g. ![]() sealing for wet loads) must be taken into
consideration in accordance with national directives.
sealing for wet loads) must be taken into
consideration in accordance with national directives.
- Practical instructions
-
The basis
Quality with the environment in mind
Working with hard foam support elements
The tools
Recommended cutting techniques for the ELEMENT construction panel
LUX ELEMENTS®- ELEMENT EL
LUX ELEMENTS®- ELEMENT-SL / SQ
Bending radii, slit spacings, dimensions of pre-slit hard foam
Processing instructions with slit panels
LUX ELEMENTS®- ELEMENT-VK
General processing instructions
Processing tips
The following materials are suitable for cladding hard foam support elements
- Application areas
-
Walls in interior areas
Attaching to masonry, concrete or plaster with mortar
Wall levelling over existing tile coverings
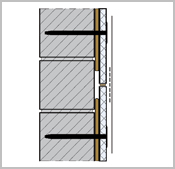
The multi-functional construction panel: application on the wall (example)
Application on free-standing metalsupports
The multi-functional construction panel: application on metal stud frame (example)
Wall-mounted elements
The creation of a levelling construction
Planking of a support construction
Floor applications
Application on beton or screed
Application on wooden floor boards
Application on the floor
The multi-functional construction panel: on mineral substrate (example)
Floor shower base
- Construction & design
-
With straight panels
Partition walls or room dividers
With slit panels
- Practical examples

- Product
- Datasheets
-
LUX ELEMENTS®- ELEMENT-EL (411 KB) LUX ELEMENTS®- ELEMENT-SL/SQ 30, 50, 80 (134 KB) LUX ELEMENTS®- ELEMENT-VK (411 KB)
- Safety Data Sheets
-
- Installation instructions
- Product & packaging specs
- Systemcomponents
-
The proven and tested system components are fully matched to the processing of the hard foam support elements. The specially developed accessories ensure trouble-free working and high processing reliability.
LUX ELEMENTS®- ARM: Reinforcement fabric LUX ELEMENTS®- COL: Adhesives LUX ELEMENTS®- DRY: Sealing filler and sealing tapes LUX ELEMENTS®- FIX: Fastening sets and plugs/exterior LUX ELEMENTS®- MONT: Mounting aids
![]()
Before printing a pdf file, please check if this is really necessary.
Environmental protection concerns us all.
To view the PDF files, you will need Acrobat Reader that you can download here free-of-charge. This program will enable you to open, view and print out these documents in PDF format.