1
2
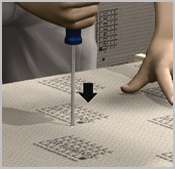
Pre-pierce dowel holes using a cross slot screwdriver.
3
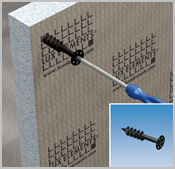
Pre-screw FIX-SD into the top plate (Recommended thickness: ELEMENT-EL 100).
4
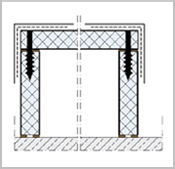
Vertically and horizontally align the side sections, mark the stand, glue to the wall and floor with COL-MK.
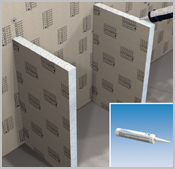
5
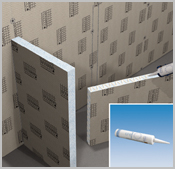
Apply COL-MK to the top of the side sections.

6
Apply the top plate and press on firmly.
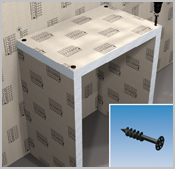
7
Finally screw FIX-SD through the top plate into the side sections for fixation.
8
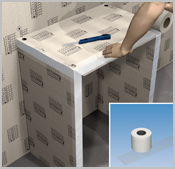
Reinforce all joints/transitions with ARM-100 SK. Can be cut with a cutter, cut and fold in the edges.

9
Level out the reinforced points with COL-AK. OPTIONAL: Panel and shelf from residual material. Cut to size, glue in with COL-MK, additionally fix shelf with FIX-SD.
- Practical instructions
-
The basis
Quality with the environment in mind
Working with hard foam support elements
The tools
Recommended cutting techniques for the ELEMENT construction panel
LUX ELEMENTS®- ELEMENT EL
LUX ELEMENTS®- ELEMENT-SL / SQ
Bending radii, slit spacings, dimensions of pre-slit hard foam
Processing instructions with slit panels
LUX ELEMENTS®- ELEMENT-VK
General processing instructions
Processing tips
The following materials are suitable for cladding hard foam support elements
- Application areas
-
Walls in interior areas
Attaching to masonry, concrete or plaster with mortar
Wall levelling over existing tile coverings
The multi-functional construction panel: application on the wall (example)
Application on free-standing metalsupports
The multi-functional construction panel: application on metal stud frame (example)
Wall-mounted elements
The creation of a levelling construction
Planking of a support construction
Floor applications
Application on beton or screed
Application on wooden floor boards
Application on the floor
The multi-functional construction panel: on mineral substrate (example)
Floor shower base
- Construction & design
-
With straight panels
Partition walls or room dividers
Simple washstand construction
With slit panels
- Practical examples

- Product
- Datasheets
-
LUX ELEMENTS®- ELEMENT-EL (411 KB) LUX ELEMENTS®- ELEMENT-SL/SQ 30, 50, 80 (134 KB) LUX ELEMENTS®- ELEMENT-VK (411 KB)
- Safety Data Sheets
-
- Installation instructions
- Product & packaging specs
- Systemcomponents
-
The proven and tested system components are fully matched to the processing of the hard foam support elements. The specially developed accessories ensure trouble-free working and high processing reliability.
LUX ELEMENTS®- ARM: Reinforcement fabric LUX ELEMENTS®- COL: Adhesives LUX ELEMENTS®- DRY: Sealing filler and sealing tapes LUX ELEMENTS®- FIX: Fastening sets and plugs/exterior LUX ELEMENTS®- MONT: Mounting aids
![]()
Before printing a pdf file, please check if this is really necessary.
Environmental protection concerns us all.
To view the PDF files, you will need Acrobat Reader that you can download here free-of-charge. This program will enable you to open, view and print out these documents in PDF format.