1
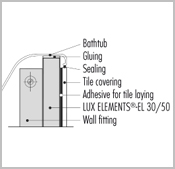
The bathtub is positioned and aligned by means of the tub legs, and the connections are professionally mounted.
2
Wall fittings are required for the installation of the head and side claddings (each approx. 50 x 50 x 500 mm) and fittings for the shelf element, cut from residual material.
3
The auxiliary end stop for mounting the head element has to be installed first.
4
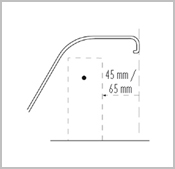
For cladding we recommend LUX ELEMENTS®-ELEMENT-EL 30 (50). Take into consideration the thickness of the elements and the added measurement of the tiling when positioning the wall fittings. Depending on the tile thickness, the fitting has to be set back approx. 45 mm (65 mm) from the bath tub edge.
5
Mark the position of the wall fitting with a vertical line. Markings for drill holes, centre of end stop, top and bottom.
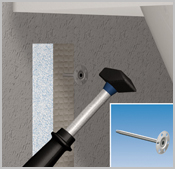
6
Drill two holes for each wall fitting using an 8 mm drill. Hold the wall fitting in position and hammer in the hammer fix plugs FIX-FID.
7
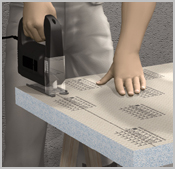
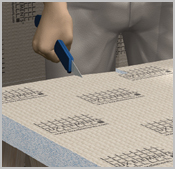
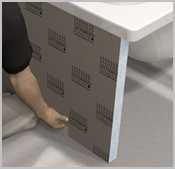
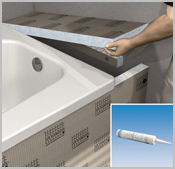
Cut the head element with a saw, setting it back from the bath tub edge to allow for the element and tile thickness.
TIP: To facilitate the later installation (see Fig. 9), make handle notches in the lower area.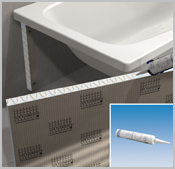
8
Apply the adhesive COL-MK to the face end of the wall fitting and the top edge of the head element.
9
Push the head element firmly under the bath tub edge and against the end stop.

10
Screw two screw plugs FIX-SD 80 into the wall fitting through the head element.
TIP: Pre-pierce dowel holes using a cross slot screwdriver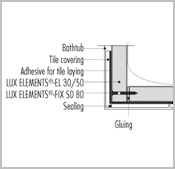
11
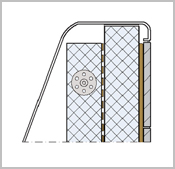
Sketch of corner detail.
12
Detailed sketch, rack: Cut the side element to size using a saw. While doing so, make the notches in the shelf area according to the sketch and in the lower area for easier installation.
13
Apply COL-MK to the face end of the wall fitting and the head element as well as to the top edge of the side element.
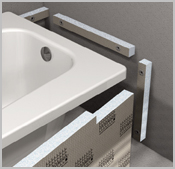
14
Install the wall fitting for the longitudinal element and the fittings for the shelf element as previously described. For this, again take into account the thickness of the element and the added tile measurement (see Fig. 4)!

15
Push the side element firmly under the bath tub edge and against the wall fitting and the head element. Then additionally connect the cladding elements and the wall fitting using two FIX-SD 80 screw plugs. TIP: Pre-pierce dowel holes using a cross slot screwdriver
16
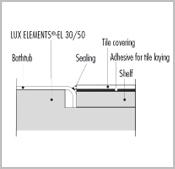
Saw the shelf element to size, apply COL-MK to the upper edge of the shelving fittings. Then position the shelf and push down firmly onto the shelving fittings and the side element.
17
- Practical instructions
-
The basis
Quality with the environment in mind
Working with hard foam support elements
The tools
Recommended cutting techniques for the ELEMENT construction panel
LUX ELEMENTS®- ELEMENT EL
LUX ELEMENTS®- ELEMENT-SL / SQ
Bending radii, slit spacings, dimensions of pre-slit hard foam
Processing instructions with slit panels
LUX ELEMENTS®- ELEMENT-VK
General processing instructions
Processing tips
The following materials are suitable for cladding hard foam support elements
- Application areas
-
Walls in interior areas
Attaching to masonry, concrete or plaster with mortar
Wall levelling over existing tile coverings
The multi-functional construction panel: application on the wall (example)
Application on free-standing metalsupports
The multi-functional construction panel: application on metal stud frame (example)
Wall-mounted elements
The creation of a levelling construction
Planking of a support construction
Floor applications
Application on beton or screed
Application on wooden floor boards
Application on the floor
The multi-functional construction panel: on mineral substrate (example)
Floor shower base
- Construction & design
-
With straight panels
Partition walls or room dividers
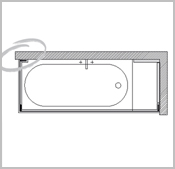
Bathtub cladding with shelf
With slit panels
- Practical examples

- Product
- Datasheets
-
LUX ELEMENTS®- ELEMENT-EL (411 KB) LUX ELEMENTS®- ELEMENT-SL/SQ 30, 50, 80 (134 KB) LUX ELEMENTS®- ELEMENT-VK (411 KB)
- Safety Data Sheets
-
- Installation instructions
- Product & packaging specs
- Systemcomponents
-
The proven and tested system components are fully matched to the processing of the hard foam support elements. The specially developed accessories ensure trouble-free working and high processing reliability.
LUX ELEMENTS®- ARM: Reinforcement fabric LUX ELEMENTS®- COL: Adhesives LUX ELEMENTS®- DRY: Sealing filler and sealing tapes LUX ELEMENTS®- FIX: Fastening sets and plugs/exterior LUX ELEMENTS®- MONT: Mounting aids
![]()
Before printing a pdf file, please check if this is really necessary.
Environmental protection concerns us all.
To view the PDF files, you will need Acrobat Reader that you can download here free-of-charge. This program will enable you to open, view and print out these documents in PDF format.